
Quick Summary: What You’ll Learn
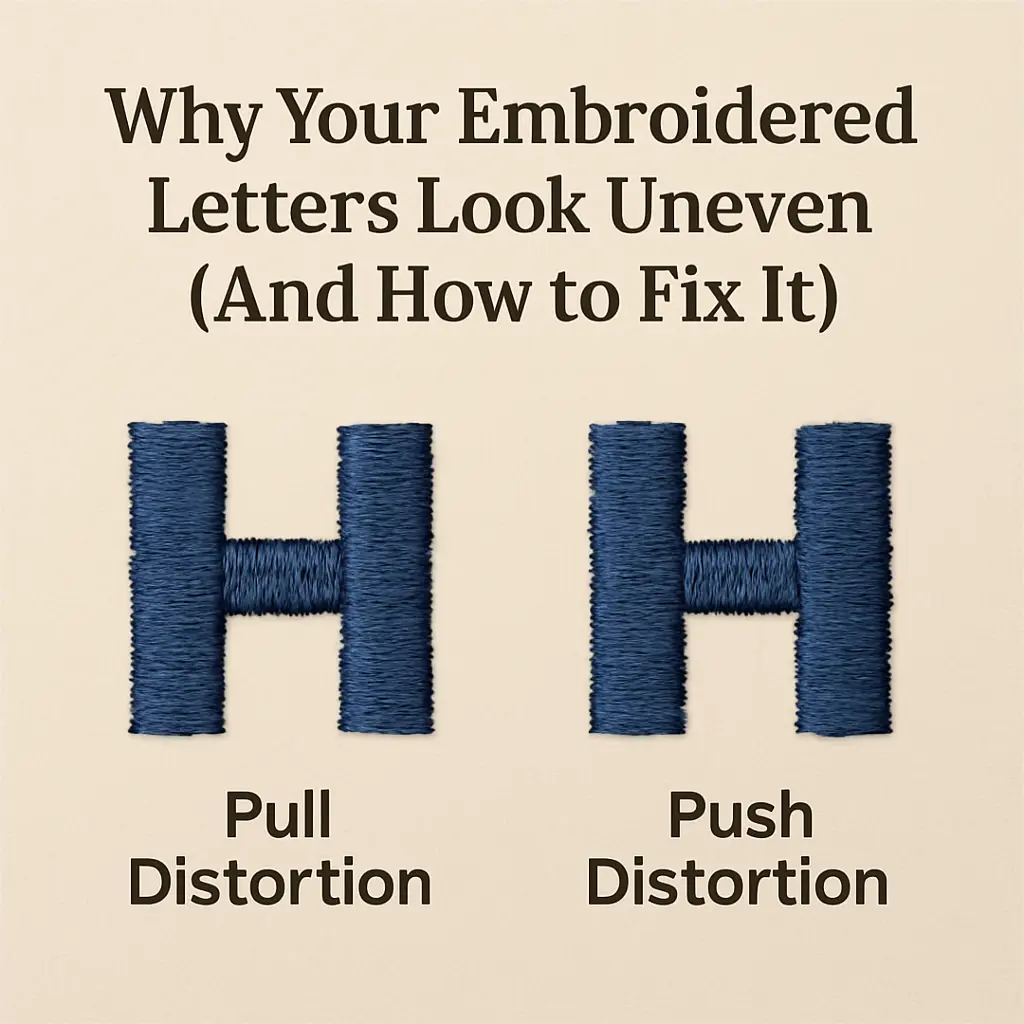
Embroidered letters look uneven because of two natural distortions: pull (when stitches tighten inward, making text narrower) and push (when stitches spread outward, making shapes bulge). Most people blame the machine or fabric, but the real issue happens during digitizing. Professional digitizers compensate for these effects before stitching even begins—widening columns, extending stitch ends, and adding underlay to keep letters sharp and readable.
If you’re ordering patches, team uniforms, or branded apparel, understanding pull and push compensation helps you avoid costly mistakes and ensures your embroidery looks professional the first time.
You’ve probably seen it before—a hoodie with lettering that looks just a bit off, or custom patches where the text seems narrower than it should be.
Maybe you’ve even ordered iron on patches USA for team uniforms, only to notice the letters don’t quite match what you approved in the design file.
Here’s what most people don’t realize: uneven embroidery has nothing to do with cheap materials or outdated machines.
The real culprit? Something that happens at the very beginning of the process, during digitizing. It’s called pull and push compensation, and understanding it can save you from wasting money on embroidered items that just don’t look right.
Let me break down what’s really going on—and why it matters for your next batch of gear or branded apparel.
The Physics Behind Every Stitch
Embroidery isn’t printing.
When you embroider, you’re driving a needle through fabric thousands of times, and each pass physically moves the material. Thread takes up space. Fabric shifts. Everything pulls and pushes in tiny ways that add up.
Think of it like writing on a balloon with a marker. The surface doesn’t stay still—it reacts to pressure.
That’s essentially what’s happening when you stitch lettering onto a polo shirt or transfer design onto a jacket backing.
For bulk orders—like 200 hoodies with a logo or embroidered caps for a corporate event—these small distortions become glaring problems if they’re not addressed upfront.
What Is Pull Distortion?
Pull compensation deals with how stitches naturally tighten during embroidery.
As thread locks into place, it squeezes the fabric slightly toward the center of the design. This is especially noticeable in horizontal satin stitches.
How Pull Affects Letter Shapes
Picture the letter “H” stitched horizontally.
Without compensation, the crossbar ends up narrower than it should be. The letter loses its bold, even appearance. Corners that should be sharp become rounded. Small text becomes nearly impossible to read.
I’ve digitized thousands of patches, varsity jackets, and corporate designs—and 90% of embroidery mistakes come from improper compensation. I’ve worked with athletic departments that ordered custom name patches for jackets, only to find the players’ names looked cramped and unprofessional.
The digitizer hadn’t accounted for pull, so every horizontal element shrank during stitching.
This isn’t just about aesthetics.
For anyone ordering custom patches for jackets or personalized morale patches, readability matters. If the text isn’t clear, the whole point is lost.
Which Fabrics Pull More Than Others
Not every material reacts the same way:
Stretchy knits (like performance jerseys) pull significantly more than stable fabrics
Fleece and hoodies create strong pull due to their thickness and texture
Caps and structured hats have tight, curved surfaces that amplify distortion
Lycra blends used in athletic wear stretch and pull unpredictably
A good digitizer adjusts column width before stitching even begins. They widen certain sections of letters so that when the thread tightens, the final result looks balanced—not squeezed.
Now that you understand how pull distortion works, let’s look at the opposite problem.
What Is Push Distortion?
Push compensation is the flip side.
This happens when vertical satin stitches spread fabric outward at the ends of each column. The bottom of a stitch pushes out more than the top, creating subtle bulges.
How Push Affects Logos and Shapes
Let’s say you’re stitching a circular logo.
Without push compensation, that perfect circle becomes an oval. Rectangular text boxes develop rounded edges. Clean, professional designs start looking amateurish.
After working with hundreds of apparel brands and team shops, I’ve learned that 80% of uneven lettering issues come down to incorrect fabric settings—not the embroidery machine.
I remember one organization that ordered custom embroidered patches for a fundraising event. They were thrilled with the design mock-up—bold letters, sharp borders, vibrant colors. But when the patches arrived, every vertical element looked slightly bloated.
The digitizer hadn’t extended the satin stitch ends properly, so the design pushed outward during production.
Why Stitch Direction Matters
Vertical columns push. Horizontal columns pull.
It sounds simple, but digitizers need to account for both within the same design. A single letter might have vertical stems (which push) and horizontal crossbars (which pull). If you only compensate for one, the letter still looks wrong.
Professional digitizers extend vertical satin ends slightly beyond where they visually appear in the design file.
This way, when the stitches push outward during embroidery, they land exactly where they’re supposed to.
Understanding both pull and push is critical, but there’s another layer that stabilizes everything.
Why Underlay Makes All the Difference
Here’s something most people ordering embroidery don’t know about: underlay stitches.
These are foundation stitches placed beneath the visible design. They stabilize the fabric, reduce pull and push, and help the top stitches sit flat.
Types of Underlay Every Digitizer Should Use
Edge-walk underlay traces the outline of a shape, anchoring the edges before satin stitches go down. This is crucial for small lettering where pull is strongest.
Zig-zag underlay crosses back and forth beneath wider sections, providing extra stability for areas prone to distortion.
Center-run underlay runs down the middle of narrow columns, keeping them from collapsing inward.
For anyone ordering custom name patches or custom patches for hats, proper underlay is non-negotiable.
Without it, even perfectly compensated designs can shift during stitching.
What Happens Without Proper Underlay
I’ve seen teams try to cut costs by working with cheap digitizing services that skip underlay entirely.
The result? Patches that pucker, letters that warp, and designs that look nothing like the original artwork.
With underlay covered, the next factor to consider is how tightly stitches are packed together.
How Stitch Density Affects Letter Quality
Density refers to how tightly stitches are packed together.
Too dense, and the thread pulls the fabric aggressively, making letters look narrow and stiff. Too loose, and letters appear gappy and uneven.
Finding the Right Density for Text
For text, finding the right density is tricky.
Small lettering needs lower density to prevent excessive pull. Larger text can handle more density without distorting. The fabric type also plays a role—twill can support higher density than delicate cotton blends.
When ordering patches for student apparel or bulk embroidered gear, density settings need to match the final application.
A patch designed for a thick denim jacket shouldn’t use the same density as one meant for a lightweight windbreaker.
How Professional Digitizers Adjust Density
Professional digitizers adjust density section by section within a single design.
The thick vertical stroke of a “B” might use one density setting, while the curved loops use another. It’s detailed work, but it’s what separates clean embroidery from mediocre results.
Once density is dialed in, there’s one more critical step before production.
Testing Before You Order in Bulk
Here’s a piece of advice I wish more people followed: always request a test sew before committing to a large order.
What a Test Sew Reveals
A test sew (or sew-out) is exactly what it sounds like—the digitizer stitches the design on the actual fabric you’ll be using.
This reveals whether pull and push compensation is working correctly. If letters look uneven in the test, adjustments can be made before hundreds of pieces go into production.
For anyone planning custom hockey patches or custom soccer patches for athletic wear, test sewing should be part of the process.
It’s a small upfront cost that prevents much larger headaches later.
The Cost of Skipping Test Sewing
I worked with a bookstore once that skipped test sewing to save time.
They ordered 500 hoodies with a mascot and name embroidered on the chest. When the shipment arrived, every single piece had distorted lettering.
The digitizer hadn’t compensated for the thick fleece fabric, and the text pulled inward so much it was barely readable. They ended up scrapping the entire order.
So what does the complete digitizing process look like when it’s done correctly?
What Good Digitizing Actually Looks Like
When you work with an experienced digitizing service, here’s what they do:
Select the Correct Fabric Profile
They select the correct fabric profile in the software before starting.
Knit, twill, denim, fleece—each one has different pull and push characteristics, and the software settings need to reflect that.
Add Appropriate Underlay
They add appropriate underlay based on stitch direction and density.
Small letters get edge-walk. Larger sections get zig-zag or center-run.
Manually Adjust for Pull
They manually adjust column widths to compensate for pull.
This isn’t something automated software does well—it takes a trained eye to know exactly how much extra width to add.
Extend Stitches for Push
They extend satin stitch ends slightly to account for push.
Again, this is a manual adjustment based on fabric type and stitch density.
Test and Refine
They test sew the design on the actual material and refine as needed.
If something looks off, they go back and tweak the file.
For organizations sourcing embroidered patches or ordering in bulk, this level of attention to detail makes all the difference between professional-looking gear and embroidery that just looks cheap.
Why This Matters for Your Brand
Let’s be practical.
When you’re ordering embroidered apparel or patches for a team, business, or organization, you’re not just buying a product—you’re investing in how your group is represented.
Uneven lettering makes everything look low-quality. It undermines brand credibility and pride. People notice.
But when embroidery is done right—when pull and push compensation is properly applied—the results speak for themselves.
Letters look crisp and professional. Logos maintain their intended shape. Production delivers what was promised in the design proof.
I’ve seen organizations switch digitizing providers mid-season because their original patches had unreadable text. I’ve talked to buyers that now insist on test sews for every new design after learning this lesson the hard way.
Quick Checklist Before You Order
If you’re planning to order embroidered items with text or detailed designs, ask these questions:
Does the digitizer adjust for the specific fabric you’re using?
Will they provide a test sew before full production?
Do they manually adjust pull and push compensation, or rely only on software automation?
What type of underlay will be used for your design?
Can they show examples of similar projects they’ve completed successfully?
These aren’t technical questions meant to confuse you—they’re practical ones that reveal whether you’re working with someone who understands what they’re doing.
Get Your Embroidery Right the First Time
Embroidery should look polished, not distorted. When letters come out uneven, it’s usually not the fabric, the machine, or the thread—it’s the digitizing.
Now that you know what pull and push compensation is, you can make smarter decisions about who handles your next order. Working with a digitizer who understands fabric behavior and compensation settings means your embroidery looks clean on the first run—no reprints, no wasted money, just professional results.