
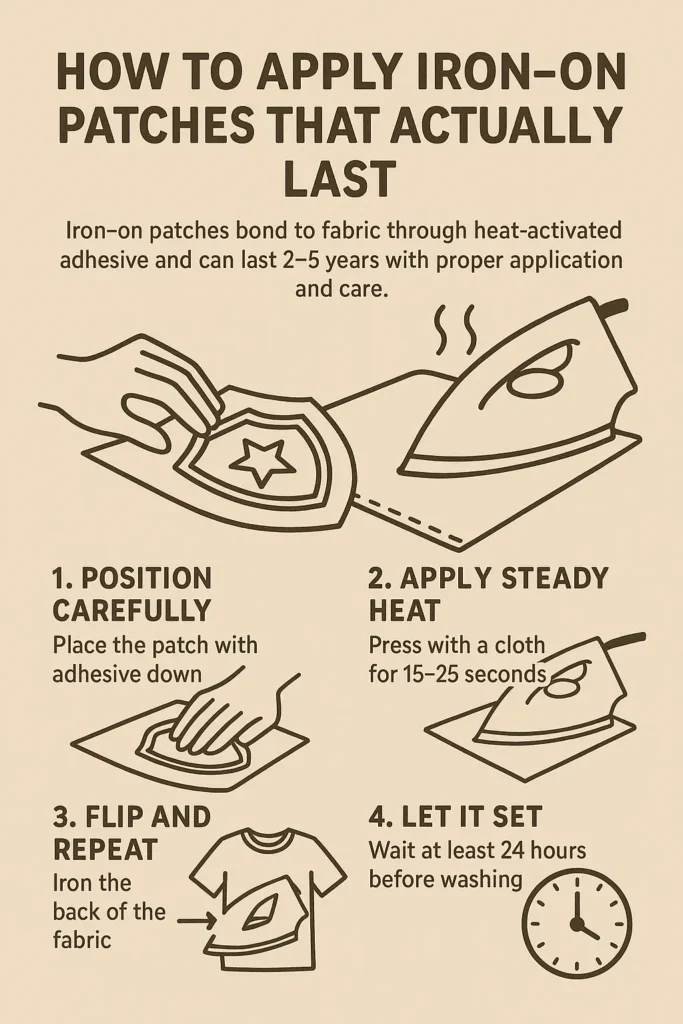
Summary: Custom Iron-on patches bond to fabric through heat-activated adhesive. With proper application and careful laundering, they offer a long-lasting, durable bond. Success depends on using the right temperature, applying firm pressure for 15-25 seconds, and washing garments inside-out in cold water to protect the bond.
If you’ve ever watched a patch peel off after just a few washes, you know how frustrating it can be. The good news? When applied correctly, iron-on patches are incredibly durable and can hold up for a long time.
I’ve seen people struggle with patches that won’t stick, corners that lift, or adhesive that fails completely. Usually, it comes down to a few simple mistakes that are easy to fix once you know what you’re doing.
💡 Why Some Patches Stick Better Than Others
The adhesive backing is everything. Think of it like a special glue that only activates when heated to a specific temperature. Once it melts into the fabric fibers and cools down, it creates a strong bond that holds the patch in place.
Here’s what makes a difference: higher-quality patches use professional-grade adhesive formulated specifically for repeated washing. Cheaper patches often use basic glue that breaks down quickly. You’ll also find that natural fabrics like cotton and denim create a much stronger bond than synthetic or coated materials.
✅ The Expert Way to Apply a Patch
Most patch failures happen during application. Follow this proven process for maximum longevity:
Preparation Checklist
- Iron: Set to medium-high heat (cotton setting). Turn off the steam function completely. Steam prevents proper bonding.
- Pressing Surface: Use a hard, flat surface (like a wooden table) instead of a padded ironing board.
- Pressing Cloth: A thin cotton cloth or lightweight towel to protect the patch and garment.
- Patience: Crucial for the cooling and setting period.
Step-by-Step Application
- Position Carefully: Place your patch exactly where you want it with the adhesive side down. Double-check the placement, as repositioning gets tricky once the bond starts.
- Apply Steady Heat: Cover the patch with your thin cotton cloth. Press down firmly for 15–25 seconds without moving the iron around. You want steady, strong pressure to force the adhesive deep into the fabric fibers.
- Flip and Repeat (The Pro Tip): Turn the garment inside out. Press the back of the fabric directly over the patch area for another 10 seconds. This ensures the adhesive penetrates all the way through the material.
- Let it Set: Give the patch at least a full minute to cool completely before touching it. This cooling period is essential for the adhesive to cure and set properly.
- Wait Before Washing: Wait 24 hours before the first wash. Patience pays off and allows the bond to fully stabilize.
🧺 Maximizing Your Patch Longevity
Once your patch is applied, how you care for the garment makes all the difference.
- Wash Inside Out: This simple step protects patches from the friction and agitation that causes edges to lift inside the machine.
- Use Cold Water: Cold water is much gentler on the heat-activated adhesive than hot water.
- Air Dry When Possible: Air drying beats machine drying every time. If you must use a dryer, keep it on low heat. High heat can reactivate the adhesive in unwanted ways.
- Skip Harsh Chemicals: Avoid harsh detergents and bleach—they are unnecessarily aggressive on both fabric and adhesive.
Troubleshooting Tip: When a corner starts to lift (and it might eventually), you can usually save the patch. Just reheat and repress it using the same technique you used originally. Catching it early prevents total failure.
🧵 Optional: Stitching as Permanent Reinforcement
Most quality patches don’t need sewing, but there are times when adding a few stitches around the edges makes sense.
For garments that experience heavy wear—work uniforms that go through weekly industrial washing, backpacks tossed around daily, or kids’ clothing—reinforcement helps.
The iron-on adhesive does the heavy lifting, and the stitching (such as a simple straight stitch or whipstitch) acts as insurance for the edges.
🚫 Fabrics to Use and Avoid
Not every fabric plays well with heat-activated adhesive. Stick with high-heat-tolerant materials:
- Cotton and cotton blends
- Denim and canvas
- Twill and similar workwear fabrics
Avoid applying patches to nylon, leather, silk, or anything with a waterproof coating. The adhesive won’t bond properly, and the high heat required can damage these delicate materials.
⏳ Durability: How Long Can You Expect the Bond to Last?
With proper application and careful laundering, a quality patch can maintain its bond for a significant amount of time. Instead of months, you can reasonably expect the patch to hold up through many, many wash cycles.
Several factors affect longevity: how often you wash the item, the water temperature you use, whether you air dry or machine dry, and the quality of the patch itself. A well-applied patch on a cotton t-shirt that’s washed weekly will naturally wear faster than one on a jacket worn occasionally. The goal is to maximize the bond’s lifespan through consistency in care.
Finding Quality Patches
Not all patches are created equal. When sourcing patches, quality matters more than price. Look for suppliers who use tested adhesives and durable materials that hold up through many washes. Companies like Teddy Patches have built their reputation on consistent quality and proper adhesive performance, which means fewer replacements and better long-term results.
The Bottom Line
Iron-on patches offer an easy, affordable way to personalize clothes or brand uniforms. They’re only as good as the application process and the care you give them afterward.
Skip the steam, use firm pressure, let everything cool completely, and wash gently. These simple practices turn a quick fix into a lasting solution that holds up wash after wash.