
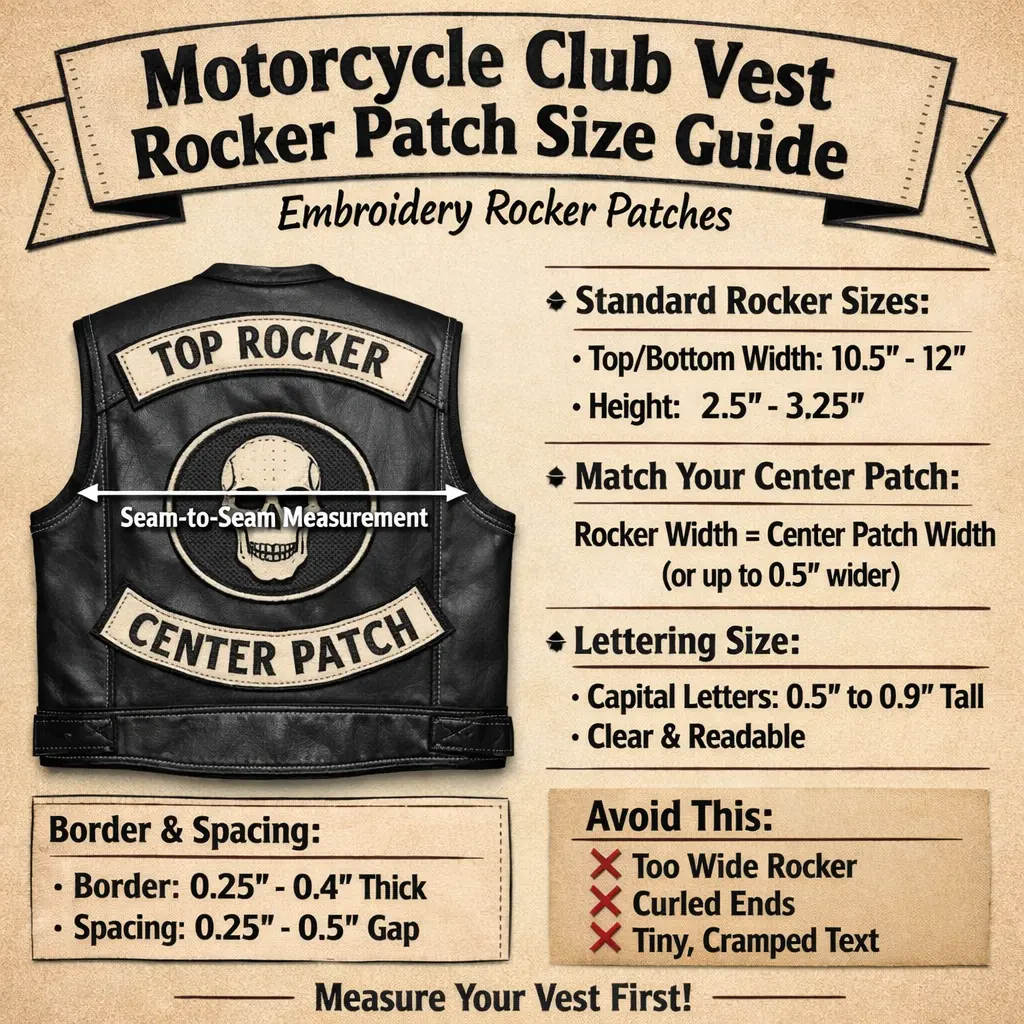
TL;DR: Rocker patches only look easy until the size is wrong. For most adult motorcycle vests, a clean top rocker usually lands around 10–12 inches wide, with 11 inches being the most common sweet spot. If the back panel is tight, go 9–10 inches. If it’s a wide panel, 12–13 inches can work. Height is usually 2.5–3.25 inches depending on font and border.
Measure the back panel seam-to-seam first, then leave 0.5–1 inch of clearance on each side so the ends don’t run into seams or curl. Keep lettering readable with 0.6–1.0 inch letter height, and if you’re running a full set (top rocker, center patch, bottom rocker), keep 0.5–0.75 inches of spacing between pieces.
Before you finalize the measurements, it helps to pick the stitch style and backing first since that can affect how clean the edges sit on leather. Here’s a quick reference on embroidered patches for motorcycle vests.
What a rocker patch is (and why size matters)
A rocker is the curved text patch that sits above or below your center patch:
- Top rocker: above the center patch (often the club name)
- Bottom rocker: below the center patch (often territory or chapter)
Most vests look best when the rockers are sized to match the center patch and fit the usable back panel, not the artboard.
The 3 Patch Rule
The “3 patch rule” refers to the traditional three-piece back setup: a top rocker, a center patch, and a bottom rocker. In motorcycle club culture, that exact layout can represent official club membership, so it’s important not to copy real club designs. If you’re creating a full back set for a brand, team, or personal project, plan all three pieces together, measure your vest first, and leave clean spacing so the layout looks balanced and fits properly.
When it comes to patches, not everything flies so before you go all in on your vest, hit up our guide on motorcycle patches to avoid or you might end up stepping on the wrong toes.”
Step 1: Measure your vest the right way (seam-to-seam)
Lay the vest flat on a table.
- Measure the back panel seam-to-seam where the rocker will sit (left seam to right seam).
- Subtract 0.5″ to 1″ total so the border does not crash into seams or thick stitching.
That final number is your maximum rocker width.
Example: If seam-to-seam is 12.25″, a safe max rocker width is usually 11.25″ to 11.75″.
This single step prevents most “it looked fine in the mockup but weird on my vest” problems.
Step 2: Rocker patch size ranges that fit most vests
These ranges work well for embroidery patches for motorcycle vest use cases, assuming your seam-to-seam measurement supports the width.
Standard adult vests (most common)
- Rocker width: 10.5″ to 12″
- Rocker height: 2.5″ to 3.25″
Smaller vests or tighter back panels
- Rocker width: 9″ to 10.5″
- Rocker height: 2.25″ to 3″
Wide back panels (larger sizes)
- Rocker width: 12″ to 13″ (only if your vest allows it)
- Rocker height: 2.75″ to 3.5″
If you are unsure, choose width first based on the vest. Then adjust height for readability.
Step 3: Match rocker width to your center patch
A simple rule that produces a clean layout:
Rocker width = center patch width (or up to 0.5″ wider)
But never exceed the maximum width you calculated from the vest.
Common pairings:
- Center patch 10″ wide → rocker 10″ to 10.75″
- Center patch 11″ wide → rocker 11″ to 11.75″
- Center patch 12″ wide → rocker 12″ to 12.75″ (only if the vest allows it)
If you are planning a full back set and want everything consistent, it helps to plan it as one order under custom patches so spacing and proportions stay balanced.
Step 4: Lettering size for embroidery (so it stays sharp)
With embroidery rocker patches, the biggest mistake is forcing too much text into too little height. Small letters can fill in, especially on curved layouts.
Wilcom’s official documentation on lettering underlay is a useful reference because it shows how very small letter heights require different handling and can become risky when pushed too small. That is why rocker height should be chosen based on readable letter height, not just “what fits.”
Practical sizing rule for rocker text: aim for capital letters around 0.5″ to 0.9″ tall, depending on:
- how many characters you have
- the font (block fonts hold up better than thin fonts)
- how tight the curve is
If the club name is long, it usually looks better to go slightly wider (if the vest allows) and use a condensed block font, instead of making the rocker extra tall.
Border thickness and spacing that makes the set look clean
Border thickness
A clean, durable embroidered rocker typically uses:
- 0.25″ to 0.4″ border thickness
Thicker borders can look bold, but they reduce space for readable letters.
Spacing between pieces (top rocker, center, bottom rocker)
A good target is:
- 0.25″ to 0.5″ gap between top rocker and center patch
- 0.25″ to 0.5″ gap between center patch and bottom rocker
Too tight feels cramped. Too wide makes the set look disconnected.
Common issues riders run into (and how to avoid them)
Rocker ends curling
Usually caused by one of these:
- rocker is too wide for the usable back panel
- border is too thick relative to rocker height
- the vest back panel has tension (common on fitted cuts)
Fix: reduce rocker width slightly, keep a moderate border, and sew with even tension.
Sew-on vs iron-on for motorcycle vests
For real riding wear, sew-on is the safer long-term choice for embroidered rockers. Leather and denim flex, and heat-applied adhesives can loosen over time depending on use and care.
If you are comparing materials for harsh weather use, you can also look at PVC patches, but for traditional club-style rockers, embroidery plus sew-on is the classic setup.
A quick production note for very wide rockers
If you are pushing widths around 12″ to 13″, shop setup can matter. Tajima’s official SAI product page lists an embroidery field size, which helps explain why some large pieces require careful hooping or workflow choices.
This does not mean wide rockers cannot be made. It just means it is smart to confirm the final stitched width and ask for a placement proof on your actual vest size.
Consultation and custom rocker patch design
If you want help designing custom rocker patches that fit your exact vest, send us:
- a photo of the vest back laid flat
- seam-to-seam measurement where the rocker will sit
- your text (club name and territory)
- preferred backing (we usually recommend sew-on for vests)
Need the whole set done right? We’re talking top rocker to bottom rocker, every piece of the puzzle. Teddy Patches hooks you up with a full custom embroidery kit starting at $99, and if you’re ordering in bulk it drops to $65 a kit. Hit us up and let’s get it sorted.