
Custom Patch Size Guide: How to Choose the Right Size for Hats, Jackets, Sleeves, Backpacks, and More
Choosing the right patch size comes down to two things: where it will go and how much detail your design needs to show clearly. This guide breaks down standard sizes for hats, sleeves, chest logos, backpacks, and jacket backs, plus the real production limits that make small text tricky in custom embroidered patches and why custom PVC patches can look cleaner at the same size. If you’re still deciding the best material overall, start here: custom patches.
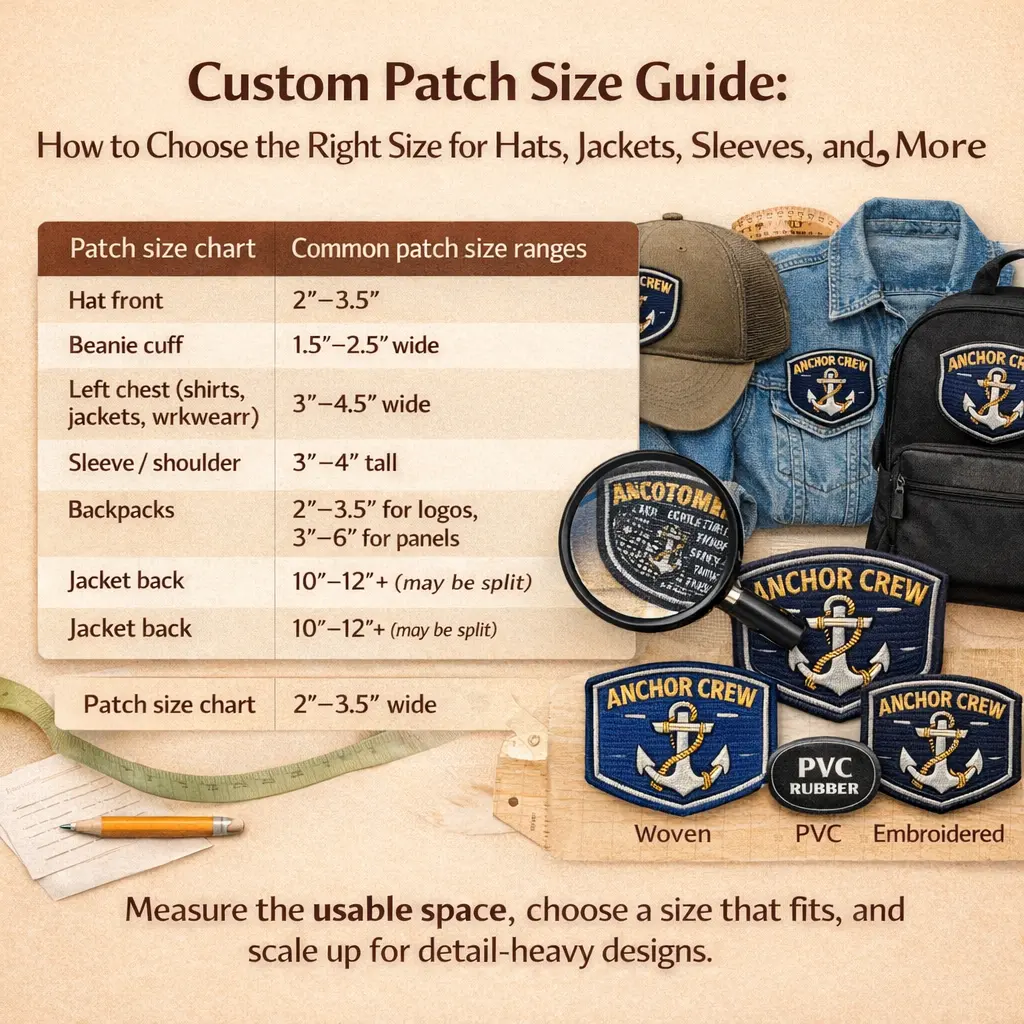
TL;DR: the most common patch sizes people order
- Hat front: 2″–3.5″ wide
- Beanie cuff: 1.5″–2.5″ wide
- Left chest (shirts, jackets, workwear): 3″–4.5″ wide
- Sleeve / shoulder: 3″–4″ tall
- Name patch (work shirts / uniforms): 3″–4″ wide (rectangle)
- Backpacks / bags: 2″–3.5″ for logos, 3″–5″ for panels
- Large jacket back: 10″–12″+ (may need splitting depending on machine field)
How patch size is measured (and what to send your patch maker)
Patch size is usually listed as width × height (inches). Circles are listed by diameter.
Before you choose a size, measure the usable space on the actual item:
- Hats: measure the front panel width and usable height (seams and the curve reduce usable space)
- Sleeves: measure the flat area between the shoulder seam and the elbow bend
- Jackets: measure the left/right chest area and the back panel if it’s a large patch
- Backpacks: measure the flattest panel, avoiding zippers, pocket seams, and rounded corners
If you’re using a merrowed/overlocked border, leave a little breathing room so the border doesn’t make the design feel cramped.
What to send your patch maker:
- Placement (hat front, left chest, sleeve, backpack panel, etc.)
- Your target size range (example: “around 3 inches wide”)
- Artwork file (vector is best, but a clean PNG works)
- Any must-have details (small tagline text, thin lines, tiny icons)
Quick patch size chart by placement
These are typical ranges people mean when they search “patch size chart” or “standard patch sizes.” Use them as a starting point and adjust based on your design shape and detail.
| Placement / Use | Common size range |
| Hat front patch | 2″–3.5″ wide |
| Beanie cuff patch | 1.5″–2.5″ wide |
| Shirt/Jacket chest logo | 3″–4.5″ wide |
| Sleeve / shoulder patch | 3″–4″ tall |
| Name patch (uniform / work shirt) | 3″–4″ wide (rectangular) |
| Morale patch (tactical / bags) | 2″–3.5″ wide |
| Scout-style patches | ~3″ (varies by shape) |
| Backpack logo patch | 2″–3.5″ |
| Backpack panel patch | 3″–5″ |
| Large jacket back patch | 10″–12″+ (may be split) |
Size vs detail: the part most size guides skip
A patch can be any size on paper, but not every size holds detail the same way once it’s actually made.
Embroidery has real “resolution” limits
Embroidery is built from thread and stitches, so detail depends on factors like needle size, thread thickness, stitch density, letter column width, and fabric stability (twill vs fleece vs soft knits). Even with strong digitizing, small text is usually the first thing to break down at smaller sizes.
Embroidery software like Wilcom also notes that satin stitches used for lettering work best when kept relatively narrow, which is why small, text-heavy designs can struggle at very small sizes.
https://help.wilcom.com/portal/en/kb/articles/embroidery-fonts-printing-fonts
Real production note: 2-inch embroidered patches with lots of text
In our experience, a 2-inch embroidered patch packed with small text usually struggles. Thread has physical thickness, stitches overlap, and tight lettering can start to close up, making the text hard to read or completely useless.
At the same 2-inch size, PVC often comes out cleaner and sharper, especially for small letters and tight gaps, because you’re not fighting stitch width or fabric pull.
Simple rule: If your design depends on reading a lot of text at 2 inches, either size up closer to 3 inches or switch to woven or PVC for better readability.
Choosing a patch size by patch type
Embroidered patch size guide
- Best when you want a classic stitched look and texture
- Safer at 3″ and up for logos that include text or fine detail
- If you must stay around 2″, keep the design bold and reduce text
Woven patch size guide
- Best for small text, thin lines, and detailed logos
- Great for 2″–3″ designs where embroidery can lose clarity
PVC (rubber) patch size guide
- Best for bold shapes, crisp edges, and outdoor use
- Strong choice for small logos with text that need a clean look at smaller sizes
Printed patch size guide
- Best for gradients, photos, or complex artwork
- Size can be flexible, but you lose the raised stitched texture
Chenille patch size guide (letterman jackets, varsity, bold designs)
Chenille is meant to be bold and readable, not tiny.
- Single letter (chest): commonly 3″–6″
- Small chenille emblem: 3″–5″
- Sleeve chenille: 3″–4.5″ (keep shapes simple because sleeves curve)
- Large back pieces: 10″–14″+ (often layered with felt and embroidery)
If you want small text on chenille, it usually needs embroidery details around it or you need to size up.
Leather patch size guide (hats, labels, workwear)
Leather patches are mostly about proportion and legibility.
- Hat front leather patch: 2″–3.5″ wide
- Classic rectangle label look: around 2″ × 3″ or 2″ × 3.5″
- Jacket hem/side label: 1.5″–2.5″ wide
Keep leather designs simple if you’re doing debossing or laser engraving.
Sequin patch size guide (fashion, dance, stage wear)
Sequins need room to lay cleanly and look intentional.
- Small sequin patch: 3″–4″
- Medium statement piece: 4″–7″
- Large fashion piece (front/back): 8″–12″+
Very small sequin patches can look crowded because the material itself needs spacing.
Common sizing picks by placement (what people actually order)
Hat patches (front panel)
Most hat patches land around 2″–3.5″ wide depending on the hat style.
- If your logo includes text, aim closer to 3″
- If it’s a simple icon, 2″–2.5″ often looks right
Beanie cuff patches
Beanie cuffs are short, so width matters more than height.
- Typical range: 1.5″–2.5″ wide
- If the cuff is narrow, stay closer to 1.5″–2″ and simplify text
Chest logo patches (workwear, uniforms, school)
A clean left-chest look usually falls in the 3″–4.5″ wide range.
- For long names, go wider rather than taller
- Keep it balanced so it doesn’t touch seams or pockets
Sleeve and shoulder patches
Sleeves curve and bend, so oversized patches can look distorted.
- Most wearable sleeve patches are 3″–4″ tall
- If the sleeve is narrow, go slightly smaller and keep the shape clean
Name patches (uniforms / work shirts)
Most name patches are rectangles in the 3″–4″ wide range.
- Readability depends on letter height and spacing
- If you want it readable from a few feet away, don’t go “micro”
Backpack patches (everyday bags and tactical packs)
Backpacks are a great placement, but seams and zippers are the trap.
- Logo patch: 2″–3.5″
- Front panel patch: 3″–5″
- Bigger works only if the panel is truly flat
Jacket back patches (large designs)
Back patches commonly start around 10″ and can go larger. At these sizes, production sometimes involves splitting the design or running it in sections.
When “oversized” runs into machine limits
Large patches are possible, but there’s no single universal maximum. The practical limit depends on the embroidery machine’s field size and frame.
For example, Tajima lists a maximum embroidery field of 200mm × 300mm on compact machines like the SAI, which helps explain why many large jacket back patches need to be split into sections.
https://www.tajima.com/product/sai/
In plain terms, many setups handle something around 8″ × 12″ comfortably in one run. Larger setups can handle bigger fields, sometimes around 14″ × 20″. If a design exceeds the available field, it may be split or run in multiple placements.
Best practice: If you’re ordering a large back patch, ask whether it will be one piece or split, and request a placement mockup before production.
A simple way to choose the right patch size (without guessing)
- Pick placement first (hat, chest, sleeve, back, bag)
- Measure the usable area on the actual item
- Match size to detail
- Lots of text or fine detail: go bigger, or use woven/PVC
- Bold simple logo: smaller sizes can work
- Ask for a placement mockup before production
This avoids most sizing regrets.
Conclusion
The right patch size depends on placement, usable space, and how much detail your design needs. Start by measuring the item, then choose a size that keeps text readable and lines clean. If your artwork is text-heavy at around 2 inches, consider sizing up or switching to woven or PVC for a sharper result.
Send us your design and a few details (item, placement, and rough size). We’ll send a quote first, and if you approve it, we’ll provide a free mockup for your approval before production. If you’re ready to move forward, request a quote for custom patches and we’ll send a free mockup before production.